> For the complete documentation index, see [llms.txt](https://servicenow-lf.gitbook.io/the-workflow-data-fabric-loom/llms.txt). Markdown versions of documentation pages are available by appending `.md` to page URLs; this page is available as [Markdown](https://servicenow-lf.gitbook.io/the-workflow-data-fabric-loom/main-exercises/lab-exercise-fundamentals.md).
# Lab Exercise: Fundamentals
[Take me back to main page](/the-workflow-data-fabric-loom/readme.md)
This lab will walk you through creation of the scoped tables needed to interact with the external system integrations.
## Data flow
The data flow below shows how ServiceNow will consume REST API endpoints via Integration Hub Spokes then further processed by a Flow so the entries will be written in the scoped table.
{% @mermaid/diagram content="graph LR
subgraph "ServiceNow AI Platform"
subgraph "Data Integration Layer"
IntHub\[Integration Hub Spoke/Flow]
end
```
subgraph "ServiceNow Native Tables"
ExpenseTable[(Expense Event Line Items Scoped Table)]
end
end
subgraph "External Systems"
ExpenseAPI[Expense Event API]
end
%% Data Flow Connections
ExpenseAPI -->|Real-time Events| IntHub
IntHub -->|Write| ExpenseTable
%% Styling
classDef external fill:#2196F3,stroke:#1565C0,stroke-width:2px,color:#fff
classDef platform fill:#4CAF50,stroke:#2E7D32,stroke-width:2px,color:#fff
classDef wdf fill:#9C27B0,stroke:#6A1B9A,stroke-width:2px,color:#fff
class IntHub wdf
class ExpenseTable platform
class ExpenseAPI external" %}
```
> **Color Legend:** 🟣 Workflow Data Fabric | 🟢 Platform | 🔵 External Systems
> [📊 View High-Resolution Diagram](https://raw.githubusercontent.com/leojacinto/WorkflowDataFabric-TypeA/main/.gitbook/assets/dataflow_fundamentals.png)
## Lab story
While you have the power of CMDB at your fingertips, the process we are solving for here does not concern CI data. You will need to create a scoped table which will store information from an expense event API. This can come from cloud services such as AWS or Azure.
The table you will create here will not be used for the rest of the steps and serves mainly to introduce how target tables for REST API endpoints are created for ServiceNow.
## Steps
### Preparation: AI Search configuration
This configuration section includes setting up of AI Search which is a critical tool for the AI Agents for your newly provisioned lab instance.
1. Using an private/incognito browser window, log on to your instance as:
1. User: **aislab.admin**
2. Password: **aislab.admin**
2. Navigate to **All** > **a.)** type **Repair Machine Learning Settings** > **b.)** click on **Repair Machine Learning Settings**.
3. Click on **Reset Machine Learning Settings**.
4. You will get a message that the machine learning settings are being reset.
5. After a 2-3 minutes, you will get a notification that the machine learning settings are reset. This will do indexing of tables in the background which will be needed for the search functionality to be used by the AI Agents later.
6. Exit your aislab.admin session and go back to your main session where you have logged in as **admin** user with the password provided to you.
### Hands on: Create a Scope
Create a dummy scope. This activity is meant to make you familiar with scope creation, the scope you will create here will not be used in the lab. If you are familiar with scope creation, you can skip this exercise as this is not a dependency in the exercises.
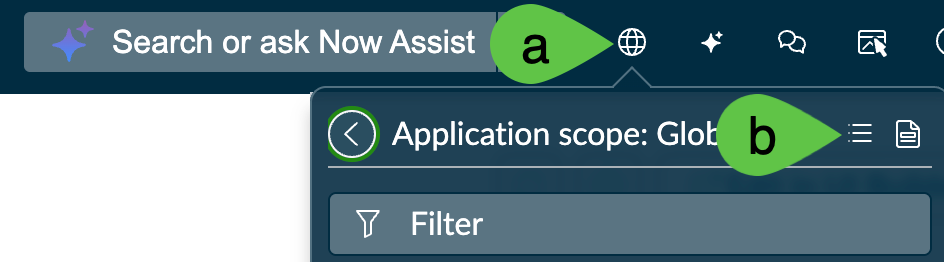
1. Go to the top right portion of your navigation and click on the **a.)** **globe icon** then **arrow** **>** the **b.)** **list icon** to create new scope.
2. In the succeeding screen, click **New**.
3. Go to section **Start from Scratch** and click **Create**
4. Provide the scope details with **a.)** name **Lab** **Forecast Variance \** and the **b.)** scope. Click **c.)** Create. Note that the scope is a technical name and is automatically populated but you have the option to change it. In this example, the scope is **x\_snc\_forecast\_var**. Feel free to add your initials at the end of the scope. The scope here will not be used in the exercise and is only meant to serve as guide in demonstrating the fundamental steps. Click **Back to list** once done.
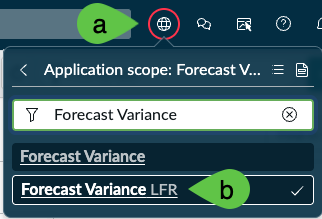
5. Verify that you are in the correct scope after you have created it. Being in the correct scope as you proceed with the lab will avoid scope access and object management issues. Do this by a.) clicking on the **a.)** scope (globe icon) and ensuring that has the value of the **b.)** **Forecast Variance \** label you created.
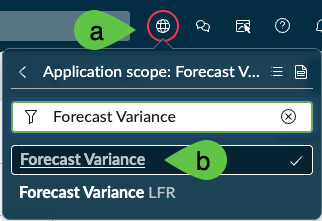
6. **THIS NEXT STEP IS CRITICAL** to ensure you are working in the correct scope in which the objects for this lab are linked to. You will need to change scope after you have created the simulation scope. Click on the **a.)** **scope** (globe icon) and **b.)** **Forecast Variance**, this time **WITHOUT** your initials. This will be the scope you will use throughout the lab.
7. Now that you are in the right scope, you are ready to create the scoped table. Navigate to All > **a.)** type **System Definition** > **b.)** search for **Tables**
8. Go to the top right section of the navigation and click **New**.
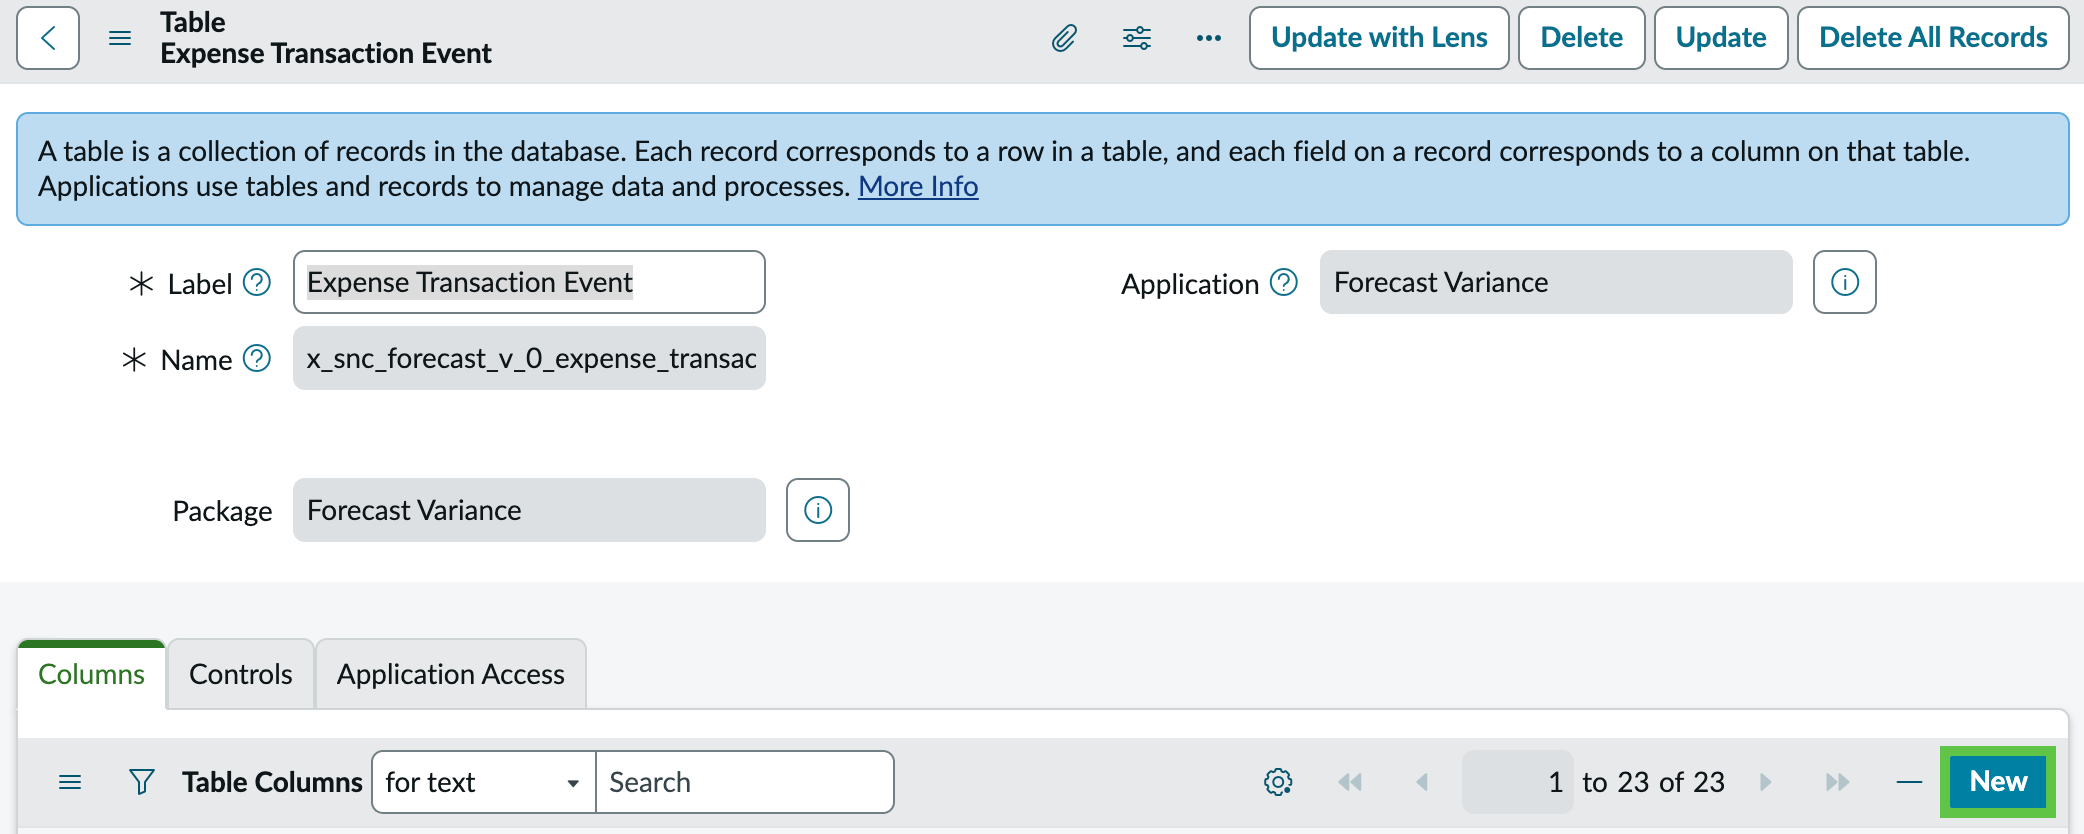
9. Provide the **a.)** **Label** as **Expense Transaction Event \**. The **b.)** **Name** which is a technical identifier will automatically be populated and can be modified to suit your requirement. Finally, **c.)** **untick Create module**.
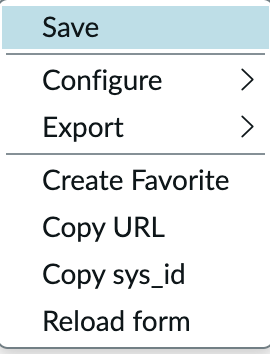
10. Right click on the header and click **Save**.
11. Staying in the same screen, an option to create fields for the table will be available. In the tab **Columns** click on **New**.
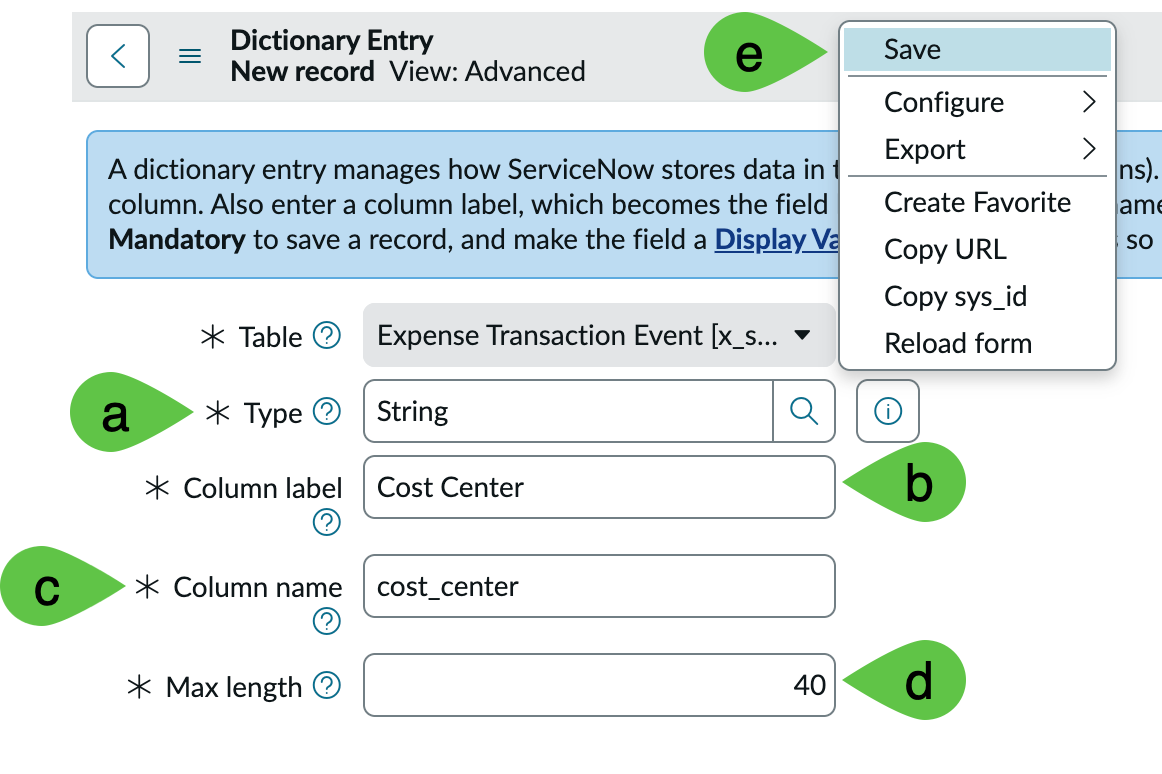
12. Let us use one column as an example. Provide the **a.)** **Type**, in this case **String**. Provide the **b.)** **Column label**, in this example, **Cost Center** which will automatically populate the **c.)** **Column name**. Since this is the string, provide the **d.)** **Max length** of **40**. Finally, right click on then header and **e.)** **Save**.
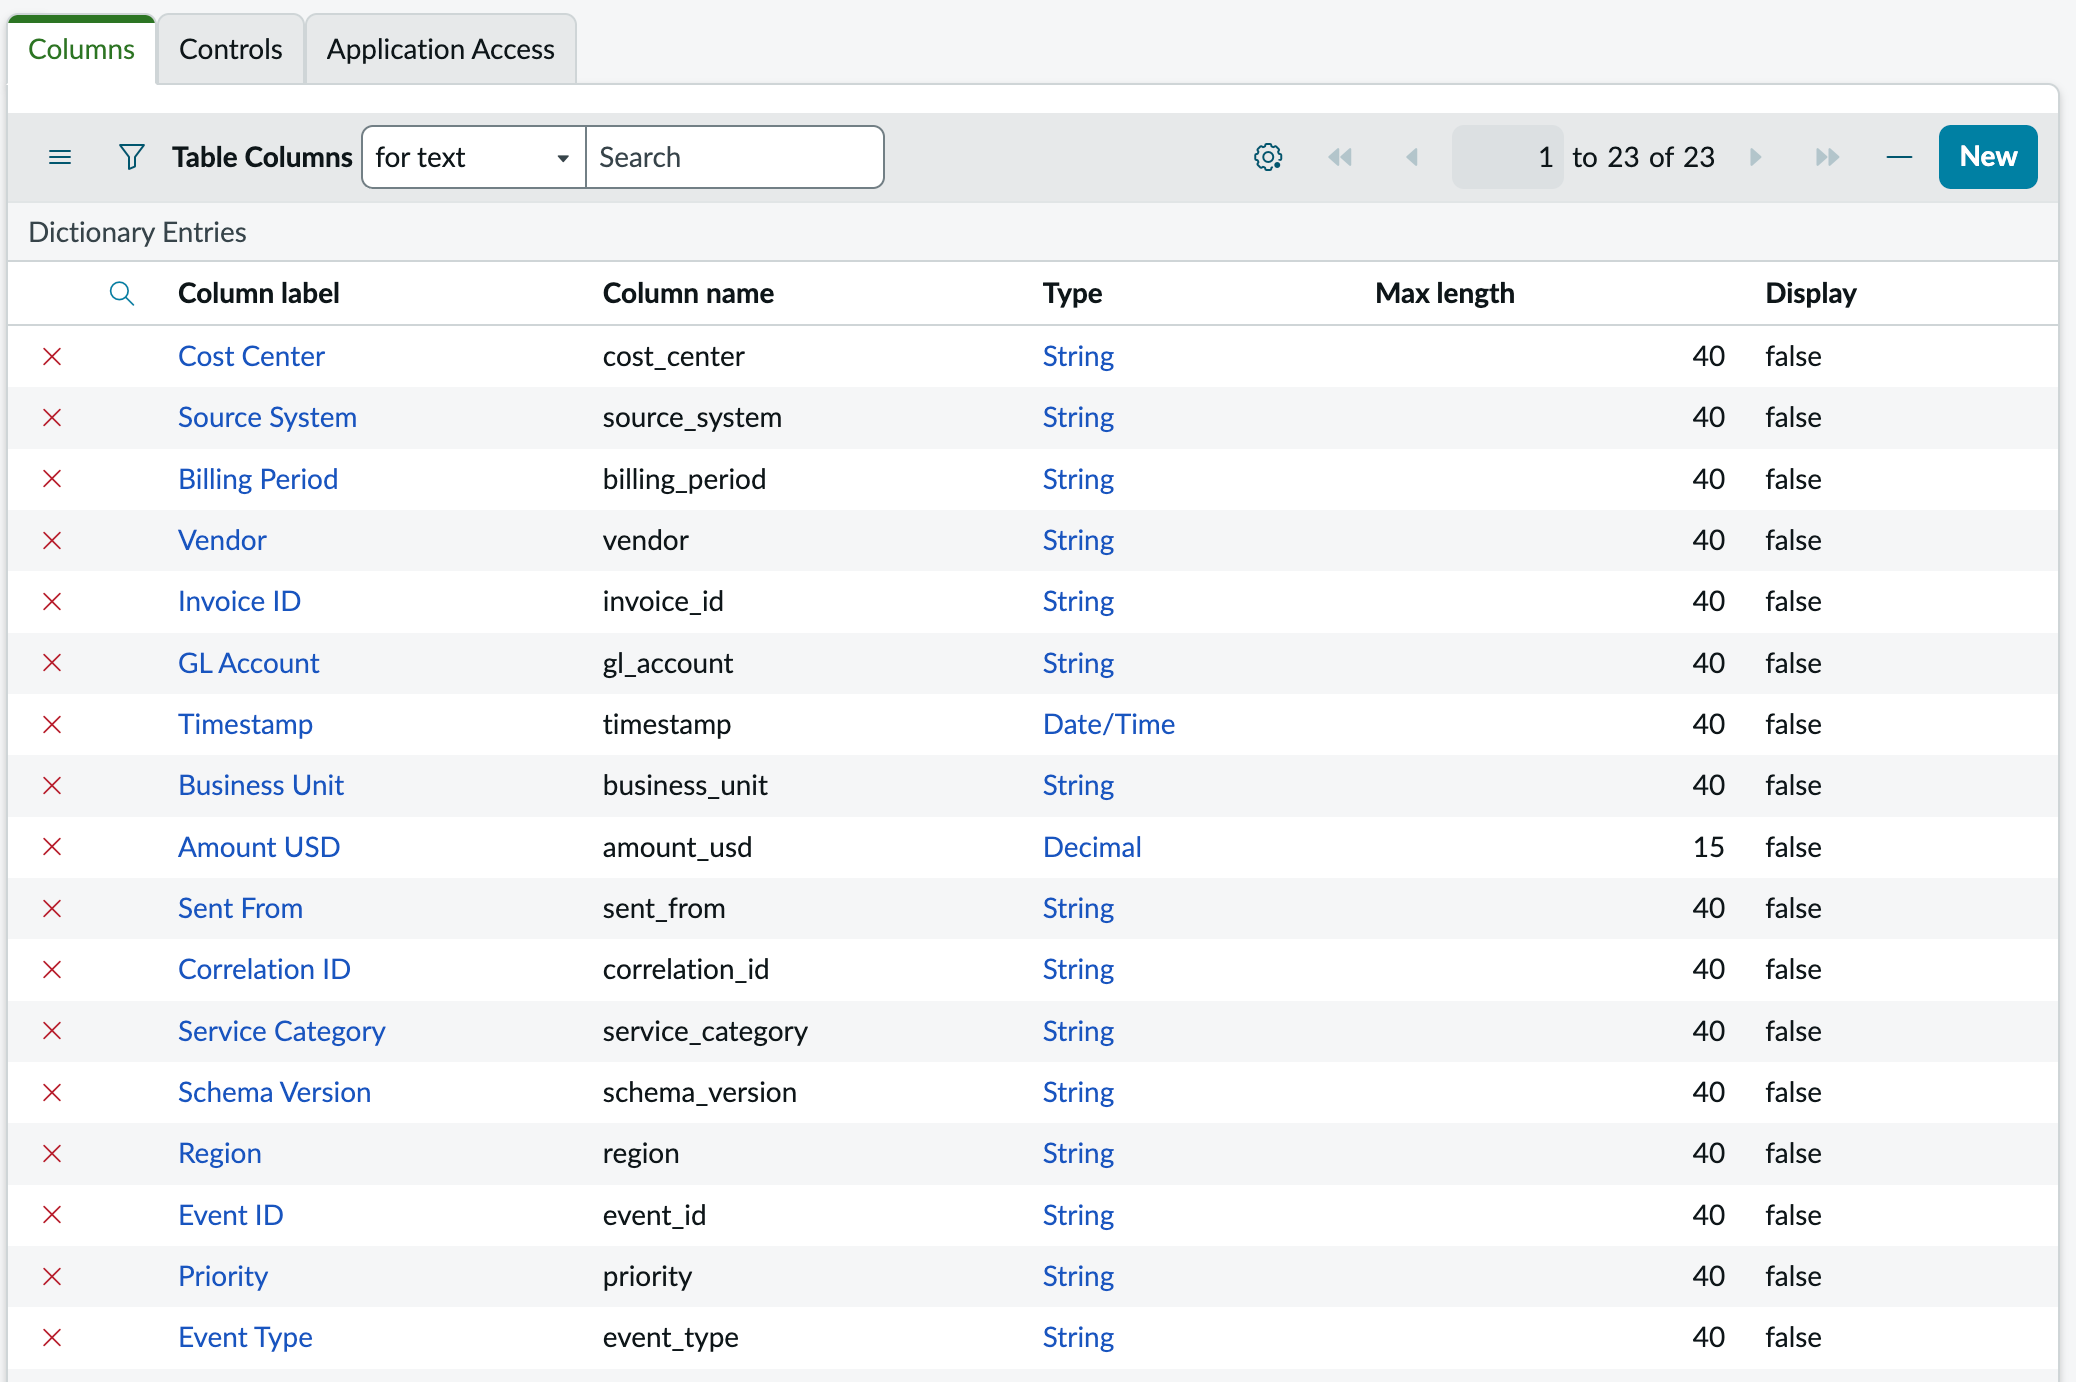
13. Do the same steps for all of the 16 other fields below. Note that the **Column label**, **Column name**, **Type**, **Max length** vary across some columns. For now, keep **Display** as **false** across all fields. Notice that these 16 fields are expense, invoice, or finance related, specifically tied to the business process problem we are solving for. Correct data foundations are critical to ensure that agents have the correct context and structure especially when delivering enterprise use cases.
## Conclusion
Congratulations! You have created the destination table within ServiceNow for the external REST API sources. As a recap, the table you created will **NOT** be used for the rest of the steps and serves mainly to introduce how target tables for REST API endpoints are created for ServiceNow.
## Next step
Let us continue building the data foundations for the use case. Next up is creation of the Data Fabric tables which will be used by AI Agents. Let us work on AI Agents' ability to use REST API connectivity by proceeding with the [Integration Hub configuration](https://servicenow-lf.gitbook.io/the-workflow-data-fabric-loom/main-exercises/lab-exercise-integration-hub).
[Take me back to main page](/the-workflow-data-fabric-loom/readme.md)
%20(1).png?alt=media)

%20(1).png?alt=media)
%20(1).png?alt=media)
%20(1).png?alt=media)


.png?alt=media)
.png?alt=media)