> For the complete documentation index, see [llms.txt](https://servicenow-lf.gitbook.io/the-workflow-data-fabric-loom/llms.txt). Markdown versions of documentation pages are available by appending `.md` to page URLs; this page is available as [Markdown](https://servicenow-lf.gitbook.io/the-workflow-data-fabric-loom/hungry-for-more/lab-exercise-external-content-connector.md).

# Lab Exercise: External Content Connector

[Take me back to main page](/the-workflow-data-fabric-loom/readme.md)

<mark style="color:$warning;">**Note:**</mark> This is a controlled lab and is only accessible in ServiceNow internal demo instances. Please bear with us as we translate this into a widely available lab exercise.

This lab will walk you through the configuration and usage of External Content Connectors as a source of unstructured document data to supplement automations needed in Finance case creation.

## Lab Sections and Objectives

<table><thead><tr><th width="83">Step</th><th width="106">Who</th><th>Description</th></tr></thead><tbody><tr><td><a href="#data-flow">1</a></td><td>Facilitator</td><td><strong>Context Setting:</strong> Review the data flow diagram showing how ServiceNow uses External Content Connectors to index and search documents from SharePoint.</td></tr></tbody></table>

**Platform Preparation**

<table><thead><tr><th width="83">Step</th><th width="106">Who</th><th>Description</th></tr></thead><tbody><tr><td><a href="#preparation-steps">2</a></td><td>Student</td><td><strong>Preparation Steps:</strong> Configure admin user email and assign ais_high_security_admin role. Log out and log back in.</td></tr></tbody></table>

**External Content Connector Configuration**

<table><thead><tr><th width="83">Step</th><th width="106">Who</th><th>Description</th></tr></thead><tbody><tr><td><a href="#connection-and-crawl-config">3</a></td><td>Student</td><td><strong>Connection and Crawl Config:</strong> Create SharePoint connection with authentication credentials. Configure and execute full document crawl with user permissions.</td></tr></tbody></table>

**Testing and Validation**

<table><thead><tr><th width="83">Step</th><th width="106">Who</th><th>Description</th></tr></thead><tbody><tr><td><a href="#usage-of-external-content-connector">4</a></td><td>Student</td><td><strong>Usage of External Content Connector:</strong> Test Now Assist queries in Employee Center. Verify document search returns relevant SharePoint content.</td></tr></tbody></table>

<table><thead><tr><th width="83">Step</th><th width="106">Who</th><th>Description</th></tr></thead><tbody><tr><td><a href="#conclusion">5</a></td><td>Facilitator</td><td><strong>Conclusion:</strong> Walk through how External Content Connectors enable ServiceNow to leverage unstructured document data for AI-powered workflows.</td></tr></tbody></table>

## Data flow

The data flow below shows how ServiceNow will get information from indexed documents from a document repository such as SharePoint to provide additional context and information to assist with Flows and Automations.

{% @mermaid/diagram content="graph LR
subgraph "User Interaction Layer"
Employee((Employee/<br/>Finance Manager))
EC\[Employee Center or<br/> Workspace with Now Assist]
end

```
subgraph "External Systems"
    SharePoint[SharePoint<br/>Executive Memos]
end

subgraph "ServiceNow AI Platform"
    subgraph "Data Integration Layer"
        ExtContent[External Content<br/>Connector]
    end

    subgraph "ServiceNow Native Tables"
        FinCase[(Finance Case<br/>Table)]
    end
end

%% Data Flow Connections
SharePoint -->|Executive Guidance| ExtContent

%% User Interaction Connections
Employee -->|Ask Questions<br/>View/Update Cases| EC
EC -->|Search & Query| FinCase
EC -->|Natural Language| ExtContent

%% Styling
classDef external fill:#2196F3,stroke:#1565C0,stroke-width:2px,color:#fff
classDef user fill:#F5F5F5,stroke:#616161,stroke-width:3px,color:#1a1a1a
classDef platform fill:#4CAF50,stroke:#2E7D32,stroke-width:2px,color:#fff
classDef wdf fill:#9C27B0,stroke:#6A1B9A,stroke-width:2px,color:#fff

class SharePoint external
class ExtContent wdf
class FinCase platform
class Employee,EC user" %}
```

> **Color Legend:** 🟢 Platform | 🟣 Workflow Data Fabric | 🔵 External Systems | ⚪ User Interaction

> [📊 View High-Resolution Diagram](https://raw.githubusercontent.com/leojacinto/WorkflowDataFabric-TypeA/main/.gitbook/assets/dataflow_external_content_connector.png)

## Steps

### Preparation steps

Configure admin user email and assign ais\_high\_security\_admin role for elevated access to External Content Connector configuration.

1. Navigate to **All** > <mark style="color:green;">**a.)**</mark> type **Users and Groups** > <mark style="color:green;">**b.)**</mark> click on **Users and Groups > Users**.

   <figure><img src="https://623113061-files.gitbook.io/~/files/v0/b/gitbook-x-prod.appspot.com/o/spaces%2FPQvQ60HFhWXWnmbX6yJi%2Fuploads%2Fgit-blob-8c874a5947daaee64ba4bde745d43ebf14d5f7a3%2Fimage%20(2)%20(1)%20(1)%20(1).png?alt=media" alt=""><figcaption></figcaption></figure>
2. Search for <mark style="color:green;">**a.)**</mark> **System Administrator** then hit **Return/Enter ↵** > <mark style="color:green;">**b.)**</mark> click on **admin**.

   <figure><img src="https://623113061-files.gitbook.io/~/files/v0/b/gitbook-x-prod.appspot.com/o/spaces%2FPQvQ60HFhWXWnmbX6yJi%2Fuploads%2Fgit-blob-2aec416b5f22a9318c1a3f2d0bfcac8bfda4d64a%2Fimage%20(10)%20(1).png?alt=media" alt=""><figcaption></figcaption></figure>
3. Set the <mark style="color:green;">**a.)**</mark> **Email** to **<demouser@wdfdemo.onmicrosoft.com>**, <mark style="color:green;">**b.)**</mark> click **Save**. Then <mark style="color:green;">**c.)**</mark> click **Roles** then <mark style="color:green;">**d.)**</mark> click **Edit**.

   <figure><img src="https://623113061-files.gitbook.io/~/files/v0/b/gitbook-x-prod.appspot.com/o/spaces%2FPQvQ60HFhWXWnmbX6yJi%2Fuploads%2FukkxNdza0rzCi2TmId0m%2Fimage.png?alt=media&amp;token=67678540-8076-42c0-978d-053f53a77aab" alt=""><figcaption></figcaption></figure>
4. Search for <mark style="color:green;">**a.)**</mark> **ais\_high\_security\_admin** > <mark style="color:green;">**b.)**</mark> click on **ais\_high\_security\_admin** > <mark style="color:green;">**c.)**</mark> click on **>** to move the role to the right panel > then <mark style="color:green;">**d.)**</mark> click **Save**.

   <figure><img src="https://623113061-files.gitbook.io/~/files/v0/b/gitbook-x-prod.appspot.com/o/spaces%2FPQvQ60HFhWXWnmbX6yJi%2Fuploads%2FrAUp1LpLxzJwMnakDh3I%2Fimage.png?alt=media&amp;token=b239f611-acaa-4960-9a14-665a07c8c01c" alt="" width="563"><figcaption></figcaption></figure>
5. Right-click on the top panel and click **Save**.

   <figure><img src="https://623113061-files.gitbook.io/~/files/v0/b/gitbook-x-prod.appspot.com/o/spaces%2FPQvQ60HFhWXWnmbX6yJi%2Fuploads%2Fw8T8AX3UTebLKiR0Vsra%2Fimage.png?alt=media&amp;token=58937d1c-0d42-443b-9a73-42ed8f3aec33" alt=""><figcaption></figcaption></figure>
6. <mark style="color:red;">**IMPORTANT**</mark>. Log out and log back in. Click on <mark style="color:green;">**a.)**</mark> your user **System Administrator** > then <mark style="color:green;">**b.)**</mark> click on **Log out**.

   <figure><img src="https://623113061-files.gitbook.io/~/files/v0/b/gitbook-x-prod.appspot.com/o/spaces%2FPQvQ60HFhWXWnmbX6yJi%2Fuploads%2Fgit-blob-6fa30863da6ee3e611717e171ff574df2674700a%2Fimage%20(2)%20(1)%20(1).png?alt=media" alt="" width="254"><figcaption></figcaption></figure>

### Connection and Crawl Config

Create SharePoint connection with authentication credentials. Configure and execute full document crawl with user permissions to index documents for AI-powered search.

1. For this step, change the scope to Global by navigating to the <mark style="color:green;">**a.)**</mark> **globe icon** and clicking <mark style="color:green;">**b.)**</mark> **Global** application scope.

   <figure><img src="https://623113061-files.gitbook.io/~/files/v0/b/gitbook-x-prod.appspot.com/o/spaces%2FPQvQ60HFhWXWnmbX6yJi%2Fuploads%2Fl84Bexg9O77tslsr0sGA%2Fimage.png?alt=media&amp;token=b25ba46a-8ba7-412b-ad99-21c0088ef725" alt="" width="321"><figcaption></figcaption></figure>
2. Elevate your role. Click on <mark style="color:green;">**a.)**</mark> your user System Administrator > then <mark style="color:green;">**b.)**</mark> click on **Elevate role**.

   <figure><img src="https://623113061-files.gitbook.io/~/files/v0/b/gitbook-x-prod.appspot.com/o/spaces%2FPQvQ60HFhWXWnmbX6yJi%2Fuploads%2FUYhVrhfeApEwwR4gtmbV%2Fimage.png?alt=media&amp;token=1170a857-21cb-441e-80e4-6416cb4bb227" alt=""><figcaption></figcaption></figure>
3. Select <mark style="color:green;">**a.)**</mark> **ais\_high\_security\_admin** then <mark style="color:green;">**b.)**</mark> click on **Update**.

   <figure><img src="https://623113061-files.gitbook.io/~/files/v0/b/gitbook-x-prod.appspot.com/o/spaces%2FPQvQ60HFhWXWnmbX6yJi%2Fuploads%2FUBLYSBW7TOyguF1QfI0O%2Fimage.png?alt=media&amp;token=9f8a8796-bcba-49ba-8493-74e999e6d07d" alt=""><figcaption></figcaption></figure>
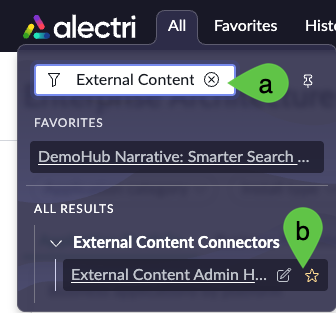
4. Navigate to All > <mark style="color:green;">**a.)**</mark> type **External Content Connectors** > <mark style="color:green;">**b.)**</mark> click on **External Content Admin Home**.

<figure><img src="https://623113061-files.gitbook.io/~/files/v0/b/gitbook-x-prod.appspot.com/o/spaces%2FPQvQ60HFhWXWnmbX6yJi%2Fuploads%2Fgit-blob-7e1062dee005a3bed0822453fbfe2a47607c8142%2Fsc_xcc_xcc_home.png?alt=media" alt=""><figcaption></figcaption></figure>

5. This will lead you the XCC home screen. Click on **Create** to create a new connection.

   <figure><img src="https://623113061-files.gitbook.io/~/files/v0/b/gitbook-x-prod.appspot.com/o/spaces%2FPQvQ60HFhWXWnmbX6yJi%2Fuploads%2Fs2ODX6l6wKenwon9V85A%2Fimage.png?alt=media&amp;token=a64dddee-5be4-4753-a208-1aafae419540" alt=""><figcaption></figcaption></figure>
6. You will be asked to select a source. Depending on your instance image, you may have multiple options. For this exercise, you only need **SharePoint**. <mark style="color:green;">**a.)**</mark> Select it and <mark style="color:green;">**b.)**</mark> click **Next**.

   <figure><img src="https://623113061-files.gitbook.io/~/files/v0/b/gitbook-x-prod.appspot.com/o/spaces%2FPQvQ60HFhWXWnmbX6yJi%2Fuploads%2FwEEG07tWXh9VkBX0CXFw%2Fimage.png?alt=media&amp;token=ed498eef-fea7-4bad-899f-fdf82e80c764" alt="" width="563"><figcaption></figcaption></figure>
7. Input the following details in the next screen. As some of the credentials here are sensitive, you will need to access them through additional logins via the corresponding links.

<mark style="color:green;">**a.)**</mark> **Connector Name: SharePoint Online \<YOUR INITIALS>**

<mark style="color:green;">**b.)**</mark> **Application (client) ID: 26ec3997-e7da-4a95-91dd-d19f8c66b849**

<mark style="color:green;">**c.)**</mark> **Directory (tenant) ID: 53136633-b712-40ba-8c0b-0747745c05be**

<mark style="color:green;">**d.)**</mark> **JKS Certificate:** [obtain here](https://servicenow.sharepoint.com/:u:/s/iaapj/IQC6aY0kjVdSQYrYR8JkpYi3AUVOyZAxfP3GsT6W96xpWII?e=Ee7nZt) and upload, <mark style="color:$warning;">**ServiceNow internal login required**</mark>

<mark style="color:green;">**e.)**</mark> **JKS certificate password:** [obtain here](https://servicenow.sharepoint.com/:x:/s/iaapj/IQA9-mRIzGQYSaI0ab6a--VYAQv5ZKgUGg0RVyiTdEDezq4?e=1gXVAa) <mark style="color:$warning;">**ServiceNow internal login required**</mark>

<mark style="color:green;">**f.)**</mark> **JKS certificate thumbprint:** [obtain here](https://servicenow.sharepoint.com/:x:/s/iaapj/IQA9-mRIzGQYSaI0ab6a--VYAQv5ZKgUGg0RVyiTdEDezq4?e=1gXVAa), <mark style="color:$warning;">**ServiceNow internal login required**</mark>

<mark style="color:green;">**g.)**</mark> Once everything is configured, you can click **Validate Connection**.

<figure><img src="https://623113061-files.gitbook.io/~/files/v0/b/gitbook-x-prod.appspot.com/o/spaces%2FPQvQ60HFhWXWnmbX6yJi%2Fuploads%2F6xNmF5nmzZut5LCM6eXu%2Fimage.png?alt=media&amp;token=a1b7e794-dbd5-48b2-a28c-9399ef6ba7e2" alt=""><figcaption></figcaption></figure>

8. If everything is correctly configured, you will get a message indicating <mark style="color:green;">**a.)**</mark> the connection is **Successfully created.** After this, click <mark style="color:green;">**b.)**</mark> **Next**.

<figure><img src="https://623113061-files.gitbook.io/~/files/v0/b/gitbook-x-prod.appspot.com/o/spaces%2FPQvQ60HFhWXWnmbX6yJi%2Fuploads%2FVUlu7mkEjiN9ZUjpj5VJ%2Fimage.png?alt=media&amp;token=354236c3-9ab0-46a1-9651-d018f1b34ee6" alt=""><figcaption></figcaption></figure>

9. The next screen shows the settings for the crawl, accept the default and click **Next**.

<figure><img src="https://623113061-files.gitbook.io/~/files/v0/b/gitbook-x-prod.appspot.com/o/spaces%2FPQvQ60HFhWXWnmbX6yJi%2Fuploads%2FseHCR5CVV87RT8vVNlXw%2Fimage.png?alt=media&amp;token=390ff3e8-6b52-4c4b-9d07-55fb98330428" alt=""><figcaption></figcaption></figure>

10. Since you are elevated as **ais\_high\_security\_admin**, you will be able to set this up. If you skipped adding the **ais\_high\_security\_admin** role and elevating to it, you will not be able to set this step up; i.e. even accepting defaults is not possible if you do not have elevated roles in this step. You can do a mapping <mark style="color:green;">**a.)**</mark> Test as an optional step. Otherwise, if you have the correct roles and have elevated your access, you can simply <mark style="color:green;">**b.)**</mark> click **Next**.

    <figure><img src="https://623113061-files.gitbook.io/~/files/v0/b/gitbook-x-prod.appspot.com/o/spaces%2FPQvQ60HFhWXWnmbX6yJi%2Fuploads%2Fl7itMBkYtM444pi51l8k%2Fimage.png?alt=media&amp;token=63f3e7a1-466c-4b66-b858-6856dd0bfb7d" alt=""><figcaption></figcaption></figure>
11. In the next screen, <mark style="color:green;">**a.)**</mark> click **Full document crawl**, <mark style="color:green;">**b.)**</mark> tick **Crawl user permissions**, then finally <mark style="color:green;">**c.)**</mark> click **Next**. If for whatever reason you miss the setting in crawling permissions, don't worry, it is possible to run it separately.

    <figure><img src="https://623113061-files.gitbook.io/~/files/v0/b/gitbook-x-prod.appspot.com/o/spaces%2FPQvQ60HFhWXWnmbX6yJi%2Fuploads%2Fgx1WD8Yo3DxcnPdcv4nH%2Fimage.png?alt=media&amp;token=d929d74a-ec90-4ce8-b968-a1160e870265" alt=""><figcaption></figcaption></figure>
12. Click **Proceed**.

    <figure><img src="https://623113061-files.gitbook.io/~/files/v0/b/gitbook-x-prod.appspot.com/o/spaces%2FPQvQ60HFhWXWnmbX6yJi%2Fuploads%2FajhWS19KBWmFJ0MhmEH0%2Fimage.png?alt=media&amp;token=a30674f6-a20a-4cb2-b578-0f951103363f" alt=""><figcaption></figcaption></figure>
13. Accept default settings and click **Save**.

    <figure><img src="https://623113061-files.gitbook.io/~/files/v0/b/gitbook-x-prod.appspot.com/o/spaces%2FPQvQ60HFhWXWnmbX6yJi%2Fuploads%2F3ztuUdRRry9A8OZ2Ryn2%2Fimage.png?alt=media&amp;token=7b9c7338-cc12-4f0b-a91f-6e3a4b78d8e2" alt=""><figcaption></figcaption></figure>
14. It will take \~1 minute for the **User Mapping** and **Document** crawls to complete.

    <figure><img src="https://623113061-files.gitbook.io/~/files/v0/b/gitbook-x-prod.appspot.com/o/spaces%2FPQvQ60HFhWXWnmbX6yJi%2Fuploads%2F1Xaj6DGoZhpDCCVBH2wp%2Fimage.png?alt=media&amp;token=f20ef2c6-d5fd-41bd-a2e4-aaea2273c64f" alt="" width="534"><figcaption></figcaption></figure>
15. Remove your role elevation, it is no longer needed at this point. Click on <mark style="color:green;">**a.)**</mark> your user **System Administrator** > then <mark style="color:green;">**b.)**</mark> click on **Elevate role**.

<figure><img src="https://623113061-files.gitbook.io/~/files/v0/b/gitbook-x-prod.appspot.com/o/spaces%2FPQvQ60HFhWXWnmbX6yJi%2Fuploads%2FUYhVrhfeApEwwR4gtmbV%2Fimage.png?alt=media&amp;token=1170a857-21cb-441e-80e4-6416cb4bb227" alt=""><figcaption></figcaption></figure>

16. Deselect <mark style="color:green;">**a.)**</mark> **ais\_high\_security\_admin** then <mark style="color:green;">**b.)**</mark> click on **Update**.

    <figure><img src="https://623113061-files.gitbook.io/~/files/v0/b/gitbook-x-prod.appspot.com/o/spaces%2FPQvQ60HFhWXWnmbX6yJi%2Fuploads%2FE0yJLFPirjSUUx8msS0E%2Fimage.png?alt=media&amp;token=6605a7d4-c3c3-45d3-9077-5d503864b3a6" alt=""><figcaption></figcaption></figure>
17. Navigate to All > <mark style="color:green;">**a.)**</mark> type **Employee Center** > <mark style="color:green;">**b.)**</mark> click on **Employee Center**.

    <figure><img src="https://623113061-files.gitbook.io/~/files/v0/b/gitbook-x-prod.appspot.com/o/spaces%2FPQvQ60HFhWXWnmbX6yJi%2Fuploads%2FRhXQnwMJDNFkF30w3kIH%2Fimage.png?alt=media&amp;token=ffca30e5-1384-4a39-b720-6be28e592c44" alt=""><figcaption></figcaption></figure>

### Usage of External Content Connector

Test Now Assist queries in Employee Center to verify that indexed SharePoint documents are searchable and provide relevant context for finance-related inquiries.

1. This will lead to the **Employee Center** home page. Note the **Ask Now Assist for help or search**. This is where you will type the query.

<figure><img src="https://623113061-files.gitbook.io/~/files/v0/b/gitbook-x-prod.appspot.com/o/spaces%2FPQvQ60HFhWXWnmbX6yJi%2Fuploads%2Fv2Yij9E6F2XGvj8uFbYx%2Fimage.png?alt=media&amp;token=93565c8c-9b0f-493e-84ab-417143403727" alt=""><figcaption></figcaption></figure>

2. In that dialog, type: **Marketing team cost centre in France seems to have gone over-budget. Can you look for any documents that can assist in checking if there are management directives which might have triggered this?** Then hit **Return/Enter ↵**.

<figure><img src="https://623113061-files.gitbook.io/~/files/v0/b/gitbook-x-prod.appspot.com/o/spaces%2FPQvQ60HFhWXWnmbX6yJi%2Fuploads%2FksAMnhMZv1HDyEnkcYXk%2Fimage.png?alt=media&amp;token=1b34b69e-b297-4be7-bb8f-4c751996e964" alt=""><figcaption></figcaption></figure>

3. You will get a <mark style="color:green;">**a.)**</mark> detailed response based on the SharePoint documents that were crawled earlier, which is also aligned with the over-budget entries. Click on the <mark style="color:green;">**b.)**</mark> number **1** then <mark style="color:green;">**c.)**</mark> take note of the PDF file **Strategic Memo - European Product Launch.pdf**. No need to click this file as this will require SharePoint login which is not provided for this activity. <mark style="color:$warning;">**Note:**</mark> as Now Assist, like any LLM-based service is probabilistic, you might get a different response or format to what you see in the screenshot below but the key ideas remain the same.

<figure><img src="https://623113061-files.gitbook.io/~/files/v0/b/gitbook-x-prod.appspot.com/o/spaces%2FPQvQ60HFhWXWnmbX6yJi%2Fuploads%2Fgit-blob-ec4de288ddb6e4afae331d8336465ffa2063fa7d%2Fsc_xcc_response%20(1).png?alt=media" alt=""><figcaption></figcaption></figure>

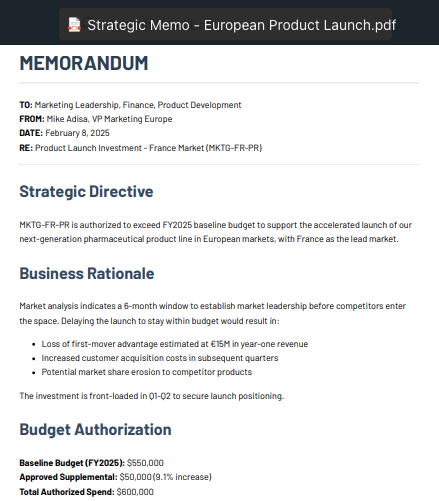
21. For reference, a screenshot of the PDF that was used as source on why cost center **MKTG-FR-PR** went over-budget is shown below.

<figure><img src="https://623113061-files.gitbook.io/~/files/v0/b/gitbook-x-prod.appspot.com/o/spaces%2FPQvQ60HFhWXWnmbX6yJi%2Fuploads%2Fgit-blob-7303273032f665b6bc5adc011d21b1e007bf7005%2Fsc_xcc_overbudget.png?alt=media" alt=""><figcaption></figcaption></figure>

## Conclusion

Congratulations! You have completed configuration of the **External Content Connector** integration that allows ServiceNow to read indexed unstructured documents to supplement unstructured data for both interactive and AI Agent-based workflows.

## Next step

Keeping with the unstructured data theme, you can explore an exercise that focuses on how ServiceNow gets unstructured data from documents and feed them into ServiceNow forms or records.

[Take me back to main page](/the-workflow-data-fabric-loom/readme.md)